Showing posts with label Sharpie Car Art. Show all posts

Thursday, September 13, 2012

8 NEW pieces of Sharpie Art!

Now that I'm backed by Sharpie, I feel the compulsion to do lots and lots of Sharpie art. They sent me tons of markers and I like putting them to good use. At the same time, I've been testing out various versions of hot press illustration board to see what works best with what I like to do. In the future I'll be setting up a store with prints and originals available... so I thought I had better get started on some originals. Or at least some good ideas for originals.

Would you like to have one of these? Hit the Buy it Now button and have a 8.5"x11" Signed, dated, numbered Print of your own!


Print
So 1st up is the curly sharpie art with the lady face. I call this one 'Thoughts' since it kind of looks like what's in her head is actually coming out onto paper. This one is different then the norm for me... still needs tweaking, but I think it could be a cool idea.


Print
2nd is a piece I call 'Sharpie City' since (to me) it looks like busy sharpie city streets. I used a different shape marker then I usually use, so it encouraged me to draw differently. More edgy, less flowy. I actually sold that one to a tv producer in Hollywood while doing the 3rd one...


Print/Original
This one I did for and at a company called Qubeey. They asked me to do a Sharpie piece while they filmed me on a huge green screen for what would become a time lapse video. It was a lot of fun to do and I got to meet some really cool people. I got it done pretty quick and everyone was really happy. It was then sold to the CEO of Qubeey.


Print/Original
The 4th one is another idea I've had for a while... the incorporation of some light airbrushing with the Sharpie-ness. I love it and I think it'll look killer on the right car. It's just the right addition to create a little extra depth and breath a little more life into the look. Also there is a paint 'kaboom' in the corner.


The 5th is one I did at a brewery event I was a part of where I did live artwork. I used Sharpie Metallic Silver and Bronze on a black board to try and create a layered effect. It's pretty neat... also needs some sharpening but a cool idea I think.


The 6th one was a test of organic and rigid shapes mixed together to create this dragon/octopus thing. Looks pretty neat... and strange at the same time.


Print/Original
This one was a submission to a Sharpie contest. The basis being the use of the colors Purple and Blue. This one was done with yellow, white, purple, and a few shades of blue- some ink and most paint markers. A tiny little bit of airbrushing was done to break up the purple. I found that the lighter paint markers allow you to make some fling and drips- which I think helps it feel less like sticker. Definitely different then my norm, but still very fun!


Print/Original

Last but not least is an idea that I've had for a loooooong time that seems to be popular. A Sharpie Blue Print. I used white paint markers on a blue board, and basically just wanted to get the idea down. On the next one I plan to go further with detail and the incorporation of mechanical things. Although just an idea, I really like the style of this one.


UPDATE:  If you'd like to see some more recent pieces check out: 2 NEW Sharpie Illusion Pieces
and 3 NEW Unique Sharpie Pieces

*All artwork is created and owned by Chris Dunlop. All rights reserved.
©Chris Dunlop (Pinstripe Chris) 2012

Tuesday, August 14, 2012

Sharpie (toy) Lamborghini!


UPDATE: This toy Lambo is for sale on eBay! Starting at $0.99 with no reserve, Check it out:

http://www.ebay.com/itm/Sharpie-Toy-Lamborghini-ART-CAR-Burango-Aventador-1-18-Custom-MINT-/300837538029?pt=Action_Figures_Diecast_US&hash=item460b5088ed

Well it's been a long time, so here's something I did for fun. Sharpie recently sent me a package full of lots and lots of markers. Included in this box was a 1/18 scale model of a Lamborghini Aventador LP700-4. Very generous gift, so I thought what better then to Sharpie it. It actually turned out to be quite challenging- The surface area was so small and I wanted to try and get in as much as possible. It got easier as I went along though. And as I was working on it I was seeing how the scale of the artwork as well as the design and shape could have a major impact on the finished product. I didn't really see it until I was about half way through, but it at least made me consider a few things. I really like doing the highly detailed and dense artwork- but maybe I need to put more focus and emphasis on the overall shape and flow. The original Sharpie Lamborghini did this wonderfully. Now it's time for me to take my artwork a little further. Looking at this scale model helped me to see the entire thing at once rather then being hunched over an area for hours at a time But back to the mini Lambo! I got the artwork done in under 2 hours- I even went as far as to take a white Sharpie Paint marker and pinstripe the rims. It may not seem like it, but it made a huge difference. Next I got to practice using the manual features on the digital camera. Since the object I was shooting was pretty small, the auto settings weren't cutting it. Just couldn't get it to focus correctly. I used some white and black illustration board as background and foreground for my make shift photo shoot. Some spiffy angles later, and some sharp focus and VoilĂ - we have cool photos! I definitely want to be doing some more of these in the future- it's great practice and a lot of fun!

Monday, May 7, 2012

The Sharpie Mustang Part 10


Another very nice day of inking achieved. Today I was able to pick up from where I left off yesterday and continue the rest of the way to the edge of the fender where the 2 tone will break off. A whooooooole lot of ink has been layed on the front end of this car. Now that I've got that section finished I can begin finishing the front edge of the hood. I saved this area for last so I can do it uniformly. And once that section is done I can move onto the clear coating and finishing stages. This car is going to look soooooooooo coool when it's done!

Sunday, May 6, 2012

The Sharpie Mustang Part 9.5

I decided to take it a little easier today to preserve my sanity... which means working 4-5 hours instead of 12-14. I did make a decent amount of progress today tho- I made it across the tallest part of the cowl hood. Since I'm not tall this proved to be the difficult area. Much reaching and stretching was involved. But with that section out of the way I can resume my working pace in easier to reach areas, which at this point, will finish out the front end. This car definitely has some of the coolest cleanest lines and designs I've ever put down- It's definitely going to look super sharp when it's done!

Monday, January 2, 2012

The Sharpie Pro Street Camaro Part 13 & 14


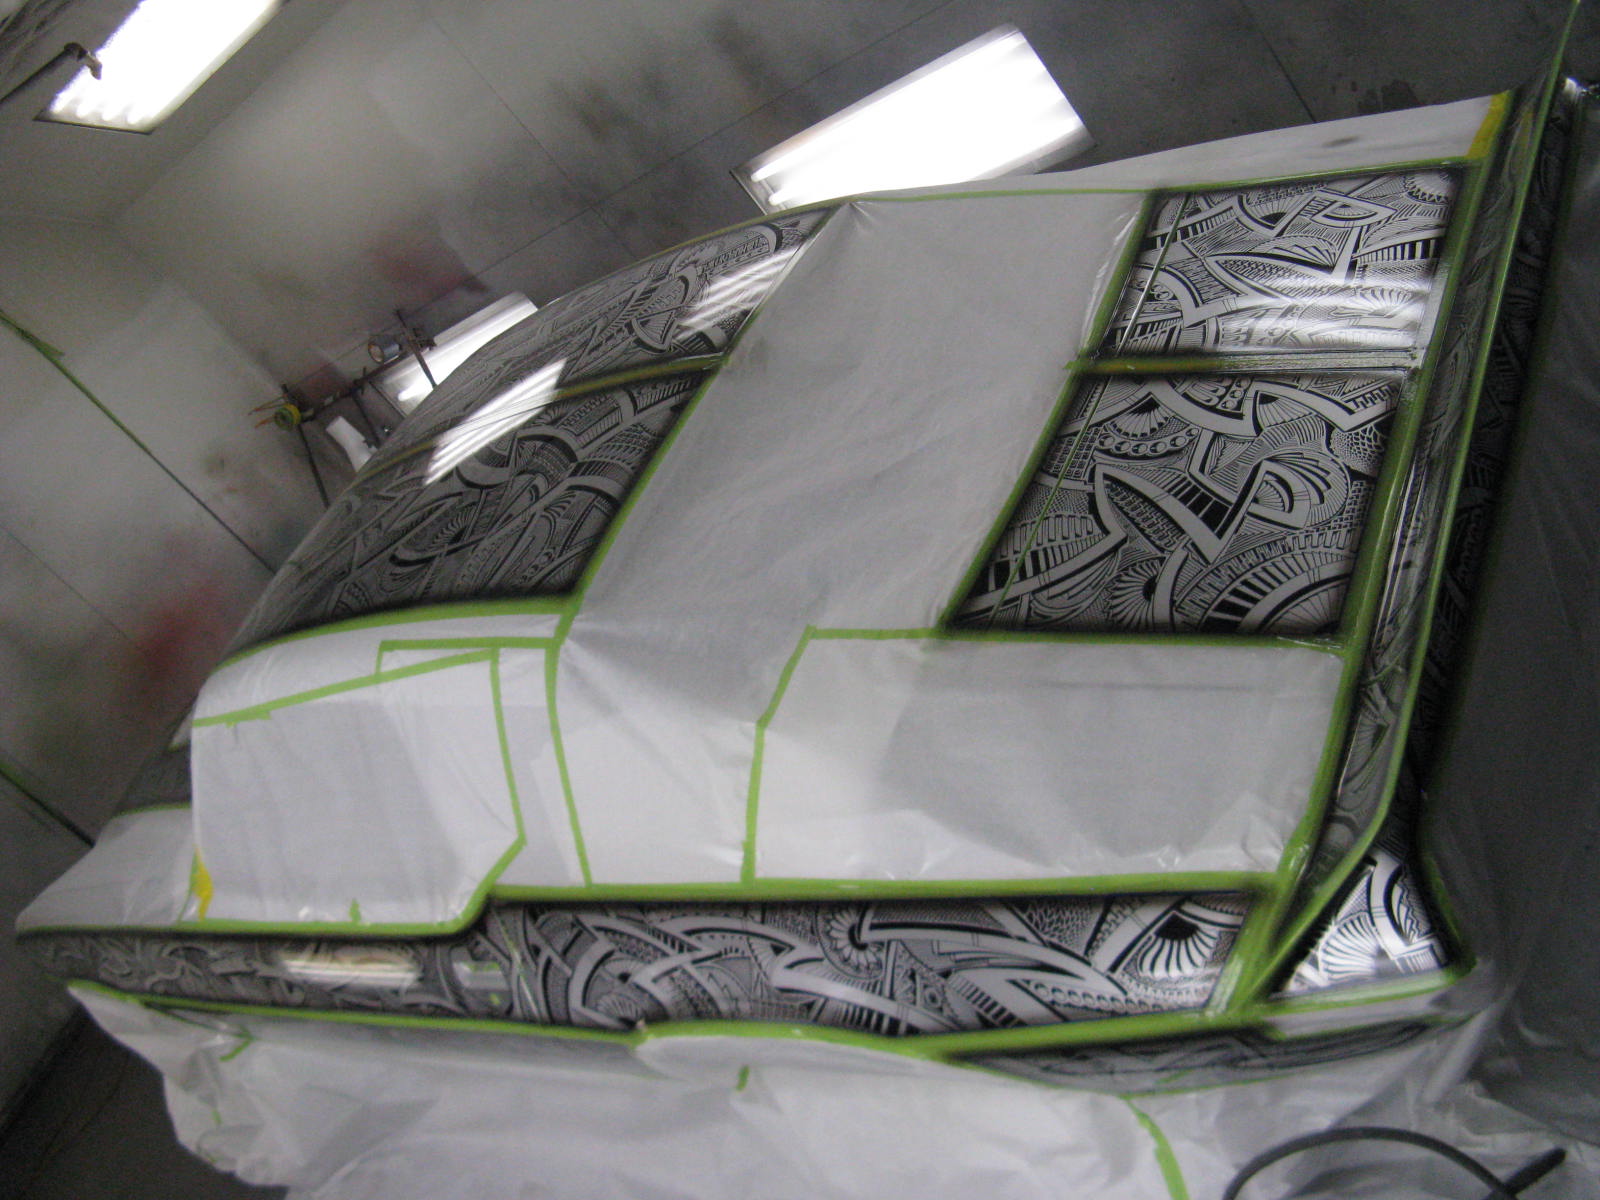
At this point, all the panels that I cleared last week were wetsanded/prepped by Miguel so that the entire car could be uniformly cleared- but first the pinstripes have to be done. The owner and I had talked a lot about the color choices to outline everything on his car and eventually arrived at Green. I was certain from the beginning that I'd be pinstriping by hand with a brush (because I'm pinstripe chris)... but it seemed this car had other plans for me. After a lot of last minute running around to try and find the colors to make the shade of green we imagined- on a holiday weekend looking for a paint that no one sells- eventually we found enough to make something out of. I made a few variations of clean bright greens and ran a few test stripes on the hood scoop for comparison. After Steve picked one, we went into the booth to lay it down. I spent a good amount of time trying to get nice lines down the edges of the panels, but ran into several problems. Rather then make excuses I will just flat out say that I wasn't able to make the lines as nice as the lines I managed to make with Sharpies on the rest of the car. I could do Ok, but not enough to do the rest of the job and car justice. So a new idea was born- Pinstripe it with Sharpies. The next morning we set out to different locations to find Sharpie Paint Pens in a usable shade of green. We found a green that worked and Steve bought as many as they had (just in case). The application was done by using fine line on just 1 side of where the stripe would be (the sharpie panel side) and very carefully running the marker like a brush against the edge. The result is a prefectly located stripe that still has some of the hand done qualities to it, as well as a very nice opaque color that dries very fast. Best of all worlds I'd say. Since I could only run the tape for the straight lines, I did all the corners free hand with a slightly smaller marker using the same green. The color really does look awesome against everything else that's on the car, and no job is really complete without pinstripes. So this car was really Sharpied  through and through. I was finishing up the 'pinstripes' while Miguel was masking up the car for final clear. Miguel is the painter/bodyman at Steve's shop, Auto Italia in Rockville, Maryland. He really knows his stuff and is an excellent painter. He did the main bodywork and initial paint job on this Camaro- so the car was really nice long before I got to it. He'll be taking the car from the point where I finished up the pinstripes all the way to finish. It's really nice to share a big job like this with someone where we could each work in phases rather then 1 person doing everything. Next up will be cleared pics!

Thursday, December 29, 2011

The Sharpie Pro Street Camaro Part 12


I've lost count of how many times I've been told this can't be done- clear coating over Sharpie I mean.

Today I unmasked the car and we rolled it out of the booth. The little drop shadow around the borders really made a difference. This was the first time we could really step back and look at the whole car- turns out it's kinda big. With eh car out of the booth I was able to get the chin spoiler and hood scoop on stands, cleaned, airbrushed, and cleared. So now all the parts are at the same stage. Next the panels will be wet sanded down and the rest of the car gone over to get the entire car ready for re-clear. But before it gets re-cleared I'll be pulling long lines by hand a round each panel to finish it out and clean up the edges.

The Sharpie Pro Street Camaro Part 11


Today mas mask up the car and clear day. The goal here was to continue masking only the panels that were Sharpied (instead of the entire body). Reason being that it's best to concentrate the need to get the clear to cooperate with the Sharpie in the smallest amounts possible. Since the car has been laid out as a panel paint job, then this works out perfectly- requiring concentration of technique over a slightly smaller surface area. Slightly. The car is nearly covered with Sharpie really, but not totally. And since the entire car is going to get cleared again, I can basically use this step as a lock down for the Sharpie so that the guy clearing the car doesn't have to worry about it. I masked the car all the way to the ground since the drive line is installed and quite pretty. Also the bottom and inside of the car has been nicely painted- so I'd like not to get any overspray on these areas. After the car was masked I went in and cleaned everything very carefully. Then I added some drop shadows around each panel going a little heavier on central lines and drop lines to simulate overhead lighting. After that I went right in with clear coat. I tried not to build up too much so there wouldn't be too much of an edge to knock down later, but wanted to make sure I had enough to protect the Sharpie. Next I'll unmask the car and we'll decide on the pinstripe!

Wednesday, December 28, 2011

The Sharpie Pro Street Camaro Part 9 & 10


Today was Sharpie the chin spoiler day. It was decided that the smart way to do it was to continue down from the artwork off the sides of the car where the 2 pieces would meet (chin spoiler/fender). So I prepped the spoiler and Steve mounted it up to the car so that I could make a decent attempt at connecting the rails from the artwork on the fenders as well as the lower valence onto the spoiler- thus making all the artwork look continuous and connected. Once that was done and remounted the front end looked as complete as the rear. From here there's no more Sharpie to do, but there is still plenty of work. The next step was really to continue looking at the car as a whole and decide on 2 things- drop shadows, and pinstripe. The order that the remaining work would be done in is mask up the panels, airbrush any drop shadows, clear panels, unmask, prep panels, pinstripe, reclear. So where we're out now it's important to make the drop shadow/pinstripe choices. Rather then trying to explain what I imagined, I went home and did  test panel. The panel I did on white and used a red pinstripe only because this panel is also for me and can be used again later- I just wanted to get the basic idea down. When I was Sharpieing on the car I intentionally ran ll the artwork off the edges, as well as connecting them to adjacent panels- trying to achieve the look of being continuous under the paint rather then just being a block on the paint. The next step to visually achieve this is an accurately placed drop shadow. The pinstripe is more of a finishing touch then anything. So next I'll be masking up the car to possibly do some airbrushing, as well as shooting clear.

Monday, December 26, 2011

The Sharpie Pro Street Camaro Part 7 & 8


These 2 parts nearly complete the Sharpie portion of this job- the hood scoop and the lower valence area. The hood scoop was done off the car so that I could get around everything as easily as possible while maintaining to connect the rails from the hood to the scoop itself. The artwork goes under the front edge and back edge of the scoop. Once it was set in place it really unified the front end and helped with the overall awesomeness. With the addition of that, it's clear that we're close to the end of drawing. Or so I thought. Steve pointed out that if I was to do the front chin spoiler that it might be a good addition to do a small area that connects it to the center stripe artwork. I wasn't sure about it at first, but after a few minutes of thinking and imagining I got it. The car is conveniently on a lift so it wasn't all bad trying to draw upside down- at least I was able to stand up. It still wasn't easy, but definitely felt like a good fit after it was done. It isn't super obvious from the ground that that section is done, but that doesn't make it count any less. Last piece to do is the chin spoiler, and with that in place the fender edges and lower center stripe will be unified. From there we move on to the more challenging stages- Clear and Pinstripes.

Tuesday, December 20, 2011

The Sharpie Pro Street Camaro Part 6


Today was Sharpie the spoiler day. I was bent in various ways twisting my wrist in directions it's not meant to go to get as nice of lines as possible in these obscurely shaped areas. The front wasn't too bad- just kind of a sharp downward angle. The backside was a bit more challenging since it has few angle changes in areas as well as being partially upside down. Making nice lines from one shape change to the next was interesting to do, but not impossible. I did the front side first before we decided on the back side. Steve made the call on doing the back side and what a difference. The sides and the top have a really good unified feel to them now- you can look down the car from the front and see the flipped edge of the spoiler and it looks great, or down the car from the back and see the opposite side of the spoiler unifying the back end. From here the scoop and chin spoiler need to be done to achieve the same finished feel of the front end. There doesn't seem like there's much blank space left on the car, but what is blank really keeps the balance.