Showing posts with label custom paint. Show all posts
Monday, May 7, 2012
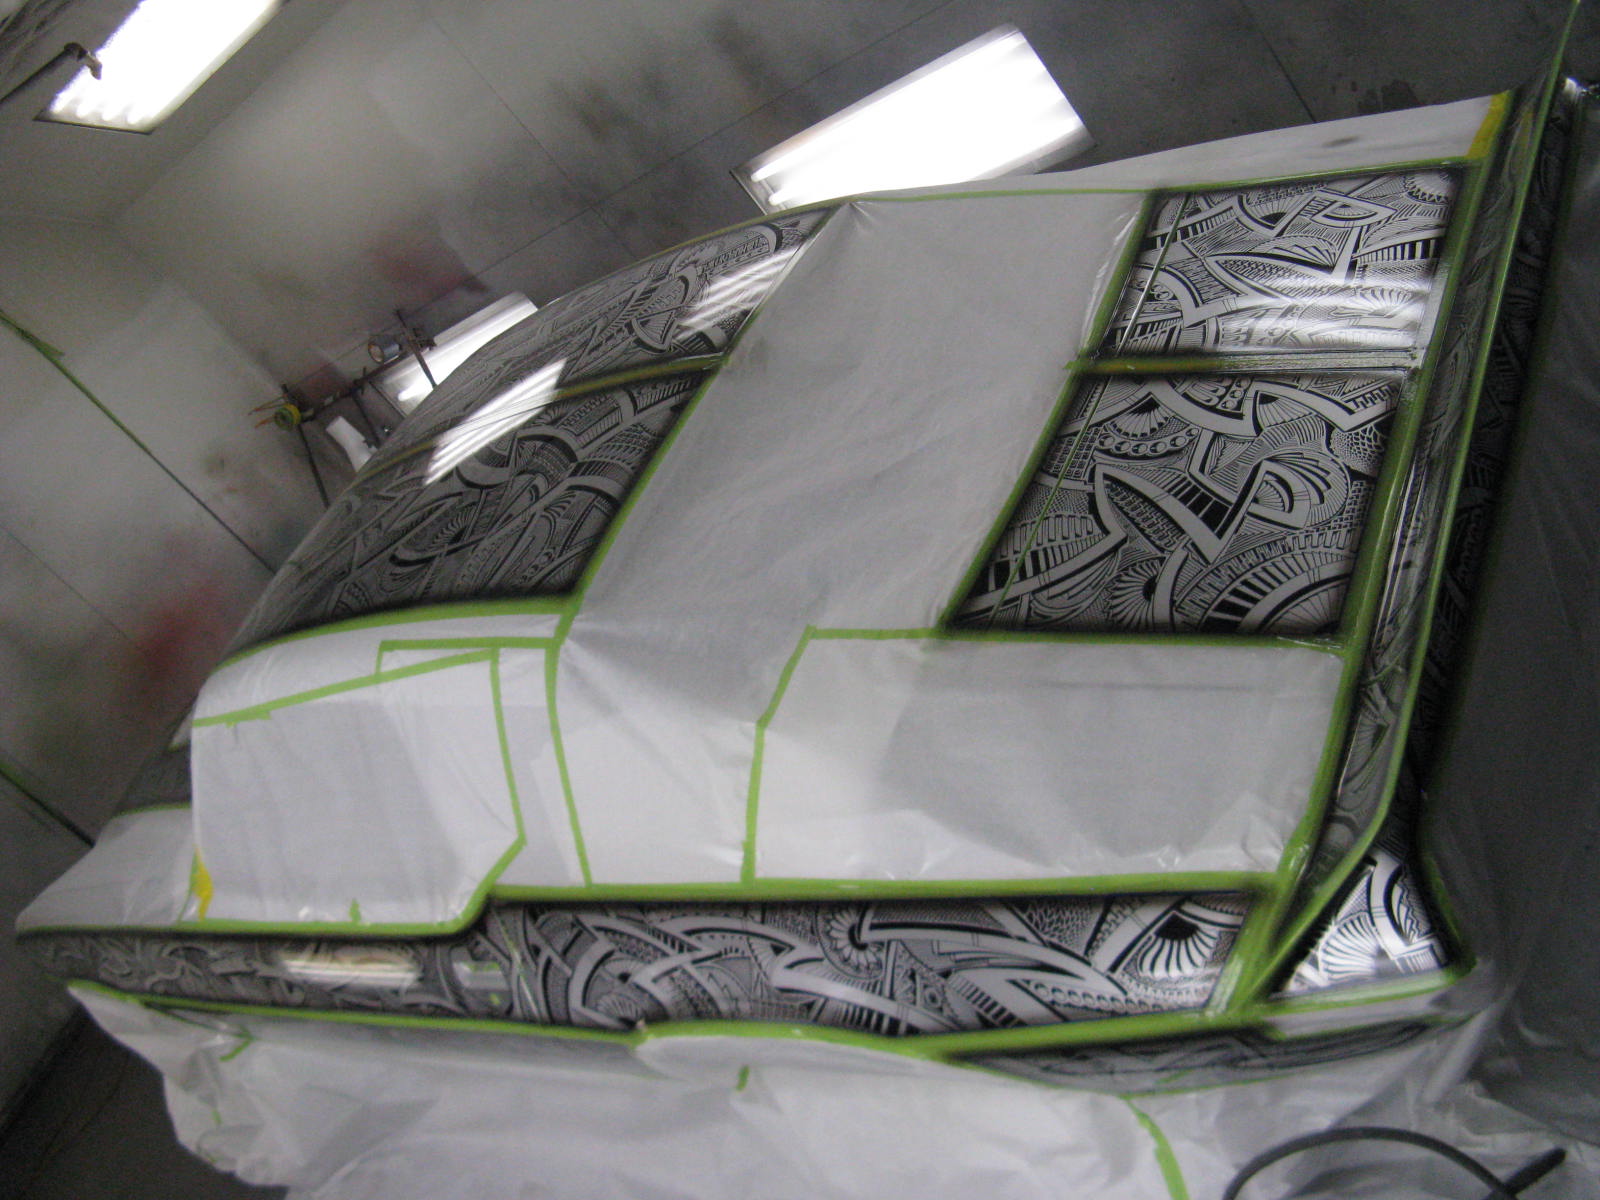
The Sharpie Mustang Part 10
Another very nice day of inking achieved. Today I was able to pick up from where I left off yesterday and continue the rest of the way to the edge of the fender where the 2 tone will break off. A whooooooole lot of ink has been layed on the front end of this car. Now that I've got that section finished I can begin finishing the front edge of the hood. I saved this area for last so I can do it uniformly. And once that section is done I can move onto the clear coating and finishing stages. This car is going to look soooooooooo coool when it's done!
Sunday, May 6, 2012
The Sharpie Mustang Part 9.5
I decided to take it a little easier today to preserve my sanity... which means working 4-5 hours instead of 12-14. I did make a decent amount of progress today tho- I made it across the tallest part of the cowl hood. Since I'm not tall this proved to be the difficult area. Much reaching and stretching was involved. But with that section out of the way I can resume my working pace in easier to reach areas, which at this point, will finish out the front end. This car definitely has some of the coolest cleanest lines and designs I've ever put down- It's definitely going to look super sharp when it's done!
Thursday, April 26, 2012
Custom 69 Camaro Rendering
UPDATE 12/8/12: This piece was SOLD!! But you can still buy a print on the store page of the website: Pinstripe Chris Store
When we moved to California I started working at a hot rod/restoration shop that is currently home for this 69 Camaro. I also started working on the car itself... I'm actually still working on the car. It landed at our shop for body and paint after having had some pretty significant customizations done at a different shop. The car was originally supposed to be painted black, but a possible spot in the BASF booth at SEMA this year meant that it could not be painted black or white. So the idea was to paint it a nice deep metallic blue that has a pearl in it that would brighten on the body lines of the car. A couple renderings of this car have already been done via CGI (one in black and one in blue), but that just wasn't doing it for me. So I offered to do a blue one using traditional media- airbrush ink, acrylics, and pencils. I whipped up a couple sketches and went with the angle I thought most effective- then I went to town with tape and paint. Once the car was done I added the gradient blue back panel to help bring out the picture. Then I went to FedEx and had a reverse color copy made so that I could put it under the paper and give the impression of lightly reflective floor. The paper is pretty transparent, so all it took was lining up the wheels to get the effect. The end result is a nice sharp blue rendering of this 69 Camaro. This piece definitely gave me lots of good practice and as always, was a blast to do!
Wednesday, March 21, 2012
Custom 54 F-100 Rendering version 2.0
About a week ago I decided to start fresh with a completely new rendering for my brothers 54 F-100. In light of recently meeting one of my personal heros, Steve Stanford, I was inspired to step up my game. So I looked at my original rendering after seeing lots of Steve's work and saw that I needed to go in a different direction. So I started from scratch with a brand new sketch that had a more effective perspective, as well as just being more accurate overall. It took me a couple evenings after work to get the colors down- it seemed like every time I looked at it I wanted to make more changes, but I just needed relax. This piece gave me the chance to practice some new things as well as complete a design. The truck itself has many customizations from a stock F-100. The biggest customization is the cab- it's a 56 cab that has 4 doors (a short rear door) that's done in a 60's "hard top" style (no frames around the doors and no center post). The other big customization is the front end- the running boards have been removed and the bottom of the fenders chopped to meet the level of the bottom of the doors. The grille is a phantom style grill that hides the headlights. Since the wheelbase is stretched with a longer cab, I drew in over sized wheels to try and keep stock looking wheelbase.
As with always this was a lot of fun to do!
Monday, January 2, 2012
The Sharpie Pro Street Camaro Part 13 & 14
At this point, all the panels that I cleared last week were wetsanded/prepped by Miguel so that the entire car could be uniformly cleared- but first the pinstripes have to be done. The owner and I had talked a lot about the color choices to outline everything on his car and eventually arrived at Green. I was certain from the beginning that I'd be pinstriping by hand with a brush (because I'm pinstripe chris)... but it seemed this car had other plans for me. After a lot of last minute running around to try and find the colors to make the shade of green we imagined- on a holiday weekend looking for a paint that no one sells- eventually we found enough to make something out of. I made a few variations of clean bright greens and ran a few test stripes on the hood scoop for comparison. After Steve picked one, we went into the booth to lay it down. I spent a good amount of time trying to get nice lines down the edges of the panels, but ran into several problems. Rather then make excuses I will just flat out say that I wasn't able to make the lines as nice as the lines I managed to make with Sharpies on the rest of the car. I could do Ok, but not enough to do the rest of the job and car justice. So a new idea was born- Pinstripe it with Sharpies. The next morning we set out to different locations to find Sharpie Paint Pens in a usable shade of green. We found a green that worked and Steve bought as many as they had (just in case). The application was done by using fine line on just 1 side of where the stripe would be (the sharpie panel side) and very carefully running the marker like a brush against the edge. The result is a prefectly located stripe that still has some of the hand done qualities to it, as well as a very nice opaque color that dries very fast. Best of all worlds I'd say. Since I could only run the tape for the straight lines, I did all the corners free hand with a slightly smaller marker using the same green. The color really does look awesome against everything else that's on the car, and no job is really complete without pinstripes. So this car was really Sharpied through and through. I was finishing up the 'pinstripes' while Miguel was masking up the car for final clear. Miguel is the painter/bodyman at Steve's shop, Auto Italia in Rockville, Maryland. He really knows his stuff and is an excellent painter. He did the main bodywork and initial paint job on this Camaro- so the car was really nice long before I got to it. He'll be taking the car from the point where I finished up the pinstripes all the way to finish. It's really nice to share a big job like this with someone where we could each work in phases rather then 1 person doing everything. Next up will be cleared pics!
Thursday, December 29, 2011
The Sharpie Pro Street Camaro Part 12
I've lost count of how many times I've been told this can't be done- clear coating over Sharpie I mean.
Today I unmasked the car and we rolled it out of the booth. The little drop shadow around the borders really made a difference. This was the first time we could really step back and look at the whole car- turns out it's kinda big. With eh car out of the booth I was able to get the chin spoiler and hood scoop on stands, cleaned, airbrushed, and cleared. So now all the parts are at the same stage. Next the panels will be wet sanded down and the rest of the car gone over to get the entire car ready for re-clear. But before it gets re-cleared I'll be pulling long lines by hand a round each panel to finish it out and clean up the edges.
The Sharpie Pro Street Camaro Part 11
Today mas mask up the car and clear day. The goal here was to continue masking only the panels that were Sharpied (instead of the entire body). Reason being that it's best to concentrate the need to get the clear to cooperate with the Sharpie in the smallest amounts possible. Since the car has been laid out as a panel paint job, then this works out perfectly- requiring concentration of technique over a slightly smaller surface area. Slightly. The car is nearly covered with Sharpie really, but not totally. And since the entire car is going to get cleared again, I can basically use this step as a lock down for the Sharpie so that the guy clearing the car doesn't have to worry about it. I masked the car all the way to the ground since the drive line is installed and quite pretty. Also the bottom and inside of the car has been nicely painted- so I'd like not to get any overspray on these areas. After the car was masked I went in and cleaned everything very carefully. Then I added some drop shadows around each panel going a little heavier on central lines and drop lines to simulate overhead lighting. After that I went right in with clear coat. I tried not to build up too much so there wouldn't be too much of an edge to knock down later, but wanted to make sure I had enough to protect the Sharpie. Next I'll unmask the car and we'll decide on the pinstripe!
Wednesday, December 28, 2011
The Sharpie Pro Street Camaro Part 9 & 10
Today was Sharpie the chin spoiler day. It was decided that the smart way to do it was to continue down from the artwork off the sides of the car where the 2 pieces would meet (chin spoiler/fender). So I prepped the spoiler and Steve mounted it up to the car so that I could make a decent attempt at connecting the rails from the artwork on the fenders as well as the lower valence onto the spoiler- thus making all the artwork look continuous and connected. Once that was done and remounted the front end looked as complete as the rear. From here there's no more Sharpie to do, but there is still plenty of work. The next step was really to continue looking at the car as a whole and decide on 2 things- drop shadows, and pinstripe. The order that the remaining work would be done in is mask up the panels, airbrush any drop shadows, clear panels, unmask, prep panels, pinstripe, reclear. So where we're out now it's important to make the drop shadow/pinstripe choices. Rather then trying to explain what I imagined, I went home and did test panel. The panel I did on white and used a red pinstripe only because this panel is also for me and can be used again later- I just wanted to get the basic idea down. When I was Sharpieing on the car I intentionally ran ll the artwork off the edges, as well as connecting them to adjacent panels- trying to achieve the look of being continuous under the paint rather then just being a block on the paint. The next step to visually achieve this is an accurately placed drop shadow. The pinstripe is more of a finishing touch then anything. So next I'll be masking up the car to possibly do some airbrushing, as well as shooting clear.
Monday, December 26, 2011
The Sharpie Pro Street Camaro Part 7 & 8
These 2 parts nearly complete the Sharpie portion of this job- the hood scoop and the lower valence area. The hood scoop was done off the car so that I could get around everything as easily as possible while maintaining to connect the rails from the hood to the scoop itself. The artwork goes under the front edge and back edge of the scoop. Once it was set in place it really unified the front end and helped with the overall awesomeness. With the addition of that, it's clear that we're close to the end of drawing. Or so I thought. Steve pointed out that if I was to do the front chin spoiler that it might be a good addition to do a small area that connects it to the center stripe artwork. I wasn't sure about it at first, but after a few minutes of thinking and imagining I got it. The car is conveniently on a lift so it wasn't all bad trying to draw upside down- at least I was able to stand up. It still wasn't easy, but definitely felt like a good fit after it was done. It isn't super obvious from the ground that that section is done, but that doesn't make it count any less. Last piece to do is the chin spoiler, and with that in place the fender edges and lower center stripe will be unified. From there we move on to the more challenging stages- Clear and Pinstripes.
Sunday, December 18, 2011
The Sharpie Pro Street Camaro Part 5
I nearly got the roof done on the day I started it, but time restrictions meant I had to stop a little earlier then usual. So today I finished up the roof and started/finished the trunk. It's been a whole mess of hours, but it's been great. There's nothing I enjoy doing more then this. At this point the car isn't covered end to end (although some might say it is)- it's been split up into sections and panels to carefully distinguish where and where not to Sharpie. The balance of the main body color and the panels is very important. Initially after the sides were done there was too much body color showing on the top of the car. We've certainly cured that. It wasn't until I got on a ladder to take some of these pics that I really saw this piece come together. At eye level you really can't see quite as much at one time. In fact, you really need to walk around it several times. The contrast of the black Sharpie against the bright silver is also super clean- no loud colors that would otherwise make this busier then it is. Next step is the spoiler and the hood scoop... then we move onto masking up the rest of the car for a little airbrushing and clear.
Wednesday, September 14, 2011
Cars at the Shop...
We've got lots of neato stuff at the shop right now... even though some are personal vehicles. None the less, there are lots of cool jobs in right now and more to come!
Left to Right:
Falcon Sprint Convertible, New Camaro (Sharpie to be), Old school Cadillac, 66 Corvair, Econoline Pickup, Classy Ford Thunderbird.
Thursday, June 23, 2011
The Moto Lady Helmet
Jeff of Saint Motor Bikes gave me this silver metal flake helmet to jazz up for our mutual friend in Portland, Oregon- The Moto Lady. After emailing with her a few hundred times, I had enough info to go on to get started. The reason for the vast number of emails was basically the creation of the Moto Lady logo on the back. I'd sketch out an idea, email it to her, she'd make her revisions and we'd move on to the next drawing until we landed at this one. And a fine one it was. Early on I had decided that most of the pinstripe design was going to go around the logo, so the logo had to be designed and lettered first. Once it was down, it was a simple process to allow the design to take shape with the logo as the center piece. I ended up using 1 Shot Black, Ivory and Bright Red, along with the use of synthetic gold leaf to complete the helmet. Everything came out suuuuper cool. I snapped a bunch of photos and sent them off to her for approval, and she returned them back to me in this beautiful package.
This is the Moto Lady: http://themotolady.com/
Sunday, June 5, 2011
The Suzuki Boulevard on FIRE
This past week I got to work on a few interesting things... this particular one is a Suzuki Boulevard. The customer wanted airbrushed real fire in real fire colors (red, orange, and yellow) over his existing pearl white paint job. This automatically means a couple of things; the colors will turn out extra vivid because they're going over white instead of the normal black, and that a smoke grey will have to be used around the flames to clean up the halo effect caused by bases and kandies over spraying onto the white. When doing a job like this over a black paint job the smoke is not necessary and wouldn't really be visible anyways. A black background will hide most if not all of the halo and over sprayed bases and kandies. Also, it's easier to come back with a little black in the airbrush and clean up some unwanted spots. Not something so easily accomplished on lighter, 3 stage, or metallic background paint jobs. So instead, a little more care is taken in placing everything where it should be, and try to be mindful of the halo areas. This particular bike also posed another challenge- the tank and radiator covers needed to be airbrushed together ON the bike so that everything would line up and the color transitions would be clean. Normally this type of job on a motorcycle can be done completely disassembled with little worry of the artwork lining up with an adjacent panel. But just like on a car; if there are adjacent panels that are going to be included then the paint job needs to be done assembled. In order to properly prep the parts of this bike it had to come apart first (tank, radiator covers, front fender, and headlight cover), then get cleaned and sanded. Next the bike was wrapped in plastic and protruding parts, like the handle bars, were wrapped in aluminium foil so that everything could be wrapped up as tight as possible. Next the tank and radiator covers were reassembled on the masked up bike. The front fender and headlight cover were done on individual stands. The first color to airbrush in was base coat red- this gives the general layout of the flames and begins the color build process. Next was base coat orange to start building the more structured pattern of the flames inside the existing red areas. Kandy orange was sprayed over everything at this stage to both deepen and enhance vibrance to the existing colors. Next was base coat yellow, and using the orange layer as the guide, I built up the shape of the flames a little more. At this stage I can see just about how the colors and pattern are going to turn out- so I mix up some base coat grey and start fogging around the edges of the shapes I've made staying slightly to the outside of them as to avoid getting grey on the yellow. I do it lightly and build up the grey until I've got it to a density I like and fog it out a bit to give a little trail. At this point things look a little messy. The trick I've found to getting the fire to blend back into the smoke is to go back with some base coat red in the airbrush and bring the red areas out into the smoke areas. This allows for the red to stay vivid over the red parts and to be a darker more purplish red as it gets into the smoke areas. It also helps make the smoke look like it comes out of the fire instead of sitting on top of it. Once the grey and red are done, I go back in with base coat yellow and resharpen any of the yellow that has been over sprayed with either red or grey. Then I hit everything with Gold kandy to give everything a nice glow. Now I'll go in with a yellowish white and highlight some of the hot spots. After that a little more Gold kandy is sprayed to make everything nice and even. Then the airbrushing is done! I carefully disassembled the bike, unmasked it and rolled it out of the booth so that the parts could be cleared. Any areas that were covered up during the airbrushing on the bike were touched up at this part to make everything look continuous. All the parts were set up on individual stands and cleared. The next day the bike was assembled and ready to go outside for some pictures.
While white is not so forgiving as black for something like this, I definitely prefer to do this type of job over white because you end up with such vivid colors. The smoke adds contrast to the flame colors and really helps them jump.
This customer was working with a budget in mind so it didn't get as crazy as it could have. He really wanted it done so we came to an agreement and took it from there.
While white is not so forgiving as black for something like this, I definitely prefer to do this type of job over white because you end up with such vivid colors. The smoke adds contrast to the flame colors and really helps them jump.
This customer was working with a budget in mind so it didn't get as crazy as it could have. He really wanted it done so we came to an agreement and took it from there.
As always, this was a lot of fun to do!
Friday, June 3, 2011
Some Pinstripe Practice
Whenever I have enough time to break out the brushes, I try to put them to good use. Lately I've had a lot of good use for them. But for once I just wanted to practice. While waiting for some gold leaf size to tack up a few days ago I did a few small pinstripe pieces on paper. I also set up a little stop watch to try and get myself to be conscious of time as I was practicing. Each piece has 2 colors, so there was the time to lay out the 1st color, plus the time to clean the brushes and mix new paint, plus the time to do the second color. Each color took about 15 minutes to do and each piece was completed in around 30 minutes. It was also neat to just do something without the worry of who it's for or likes and dislikes. Magically, these designs were quick, simple and soothing.
Pinstriping is FUN!
Wednesday, May 18, 2011
It's the Little Things...
Towards the end of last year I was asked to do some kind of stripe that would split up a 2 tone paint job being done on a truck. The owner and painter of this truck is Casey of Classic Powder (classicpowder.com). He was totally open to any ideas I had... which was great. He had already painted the top of the truck black and the bottom a nice bright metallic green when I got there. The only specification given was that he wanted it to taper from the front to the back. So I masked off the area to be striped and thought about what would be cool to do in an area this small, but still have some impact. Traditionally when I'm asked to do stripes I'm thinking I'm going to be pulling lines with a paint brush. This job was a paint through a gun. Again, not my norm, but I figured I could put a cool twist on it. Since Casey was open to anything, I decided I would try an engine turned look on base coat. We agreed that bright silver would be the best starting point. After the silver was dry enough, I made a turning tool out of a dixie cup and a scotch brite. I took the scotch brite and cut it into a circle the size of the bottom of the dixie cup, then glued the scotch brite to the bottom. I glued 2 layers of scotch brite (one on top of the other) so that the outside edges of the bottom of the cup wouldn't dig extra hard. Then, from front to back I pressed the 'tool' into the base coat and turned it by hand 180 degrees, overlapping each rotation by 50%. The look and the lines came out so clean that no additional colors or outlining was necessary. Casey cleared it all up and it came out great. It seems like a simple little touch, but it really adds something to this already cool paint job.
Another happy customer!
Tuesday, May 10, 2011
TRON style Motorcycle Helmet
Recently I was asked to do a Tron styled motorcycle helmet for a customer. The helmet started out covered end to end with stickers and needed to be sanded flat. Once it was sanded flat, I painted it with Chrysler PXR (metallic black) base coat and clear. Once that was dry I prepped the helmet again for more paint. I began by laying out the designs in 1 Shot Metallic Silver. I decided the way I was going to do this was by pulling all the lines free hand with a pinstripe brush (as I commonly do)... this would keep me from having to mask out all the lines and spray them. Also, it would keep the edges smoother instead of sharp. The widest stripe was masked out and sprayed so that it would look consistent. Once the 1 Shot was dry, I followed all the lines and circles lightly with an airbrush that had transparent white in it. This would allow for the halo effect to be really effective after the next step. The idea is to get the lines to glow like a neon sign. After that, I mixed up some Alsa Corp Blood Red Kandy and went over all the lines until I got the desired color. It took a good number of coats since I was going over whites and silvers with red kandy... this meant that the colors would start out very pink until I had applied enough to make it red. The amount of kandy used also influenced the way the glow popped in the sunlight. Inside, the helmet has a deep red look- but outside, the sun light really makes this effect jump. The look of everything worked out great. 3 coats of clear and it was done! Doesn't seem like a whole lot of steps, but mixed in with some other work, it took some time. Thankfully, the customer was very patient and happy with the results.
Subscribe to:
Posts (Atom)