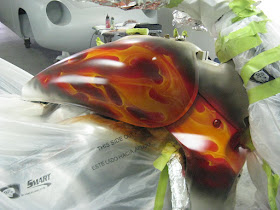
This past week I got to work on a few interesting things... this particular one is a Suzuki Boulevard. The customer wanted airbrushed real fire in real fire colors (red, orange, and yellow) over his existing pearl white paint job. This automatically means a couple of things; the colors will turn out extra vivid because they're going over white instead of the normal black, and that a smoke grey will have to be used around the flames to clean up the halo effect caused by bases and kandies over spraying onto the white. When doing a job like this over a black paint job the smoke is not necessary and wouldn't really be visible anyways. A black background will hide most if not all of the halo and over sprayed bases and kandies. Also, it's easier to come back with a little black in the airbrush and clean up some unwanted spots. Not something so easily accomplished on lighter, 3 stage, or metallic background paint jobs. So instead, a little more care is taken in placing everything where it should be, and try to be mindful of the halo areas. This particular bike also posed another challenge- the tank and radiator covers needed to be airbrushed together ON the bike so that everything would line up and the color transitions would be clean. Normally this type of job on a motorcycle can be done completely disassembled with little worry of the artwork lining up with an adjacent panel. But just like on a car; if there are adjacent panels that are going to be included then the paint job needs to be done assembled. In order to properly prep the parts of this bike it had to come apart first (tank, radiator covers, front fender, and headlight cover), then get cleaned and sanded. Next the bike was wrapped in plastic and protruding parts, like the handle bars, were wrapped in aluminium foil so that everything could be wrapped up as tight as possible. Next the tank and radiator covers were reassembled on the masked up bike. The front fender and headlight cover were done on individual stands. The first color to airbrush in was base coat red- this gives the general layout of the flames and begins the color build process. Next was base coat orange to start building the more structured pattern of the flames inside the existing red areas. Kandy orange was sprayed over everything at this stage to both deepen and enhance vibrance to the existing colors. Next was base coat yellow, and using the orange layer as the guide, I built up the shape of the flames a little more. At this stage I can see just about how the colors and pattern are going to turn out- so I mix up some base coat grey and start fogging around the edges of the shapes I've made staying slightly to the outside of them as to avoid getting grey on the yellow. I do it lightly and build up the grey until I've got it to a density I like and fog it out a bit to give a little trail. At this point things look a little messy. The trick I've found to getting the fire to blend back into the smoke is to go back with some base coat red in the airbrush and bring the red areas out into the smoke areas. This allows for the red to stay vivid over the red parts and to be a darker more purplish red as it gets into the smoke areas. It also helps make the smoke look like it comes out of the fire instead of sitting on top of it. Once the grey and red are done, I go back in with base coat yellow and resharpen any of the yellow that has been over sprayed with either red or grey. Then I hit everything with Gold kandy to give everything a nice glow. Now I'll go in with a yellowish white and highlight some of the hot spots. After that a little more Gold kandy is sprayed to make everything nice and even. Then the airbrushing is done! I carefully disassembled the bike, unmasked it and rolled it out of the booth so that the parts could be cleared. Any areas that were covered up during the airbrushing on the bike were touched up at this part to make everything look continuous. All the parts were set up on individual stands and cleared. The next day the bike was assembled and ready to go outside for some pictures.
While white is not so forgiving as black for something like this, I definitely prefer to do this type of job over white because you end up with such vivid colors. The smoke adds contrast to the flame colors and really helps them jump.
This customer was working with a budget in mind so it didn't get as crazy as it could have. He really wanted it done so we came to an agreement and took it from there.
As always, this was a lot of fun to do!


No comments:
Post a Comment